WPF hosting a C++ DirectX 11 Context
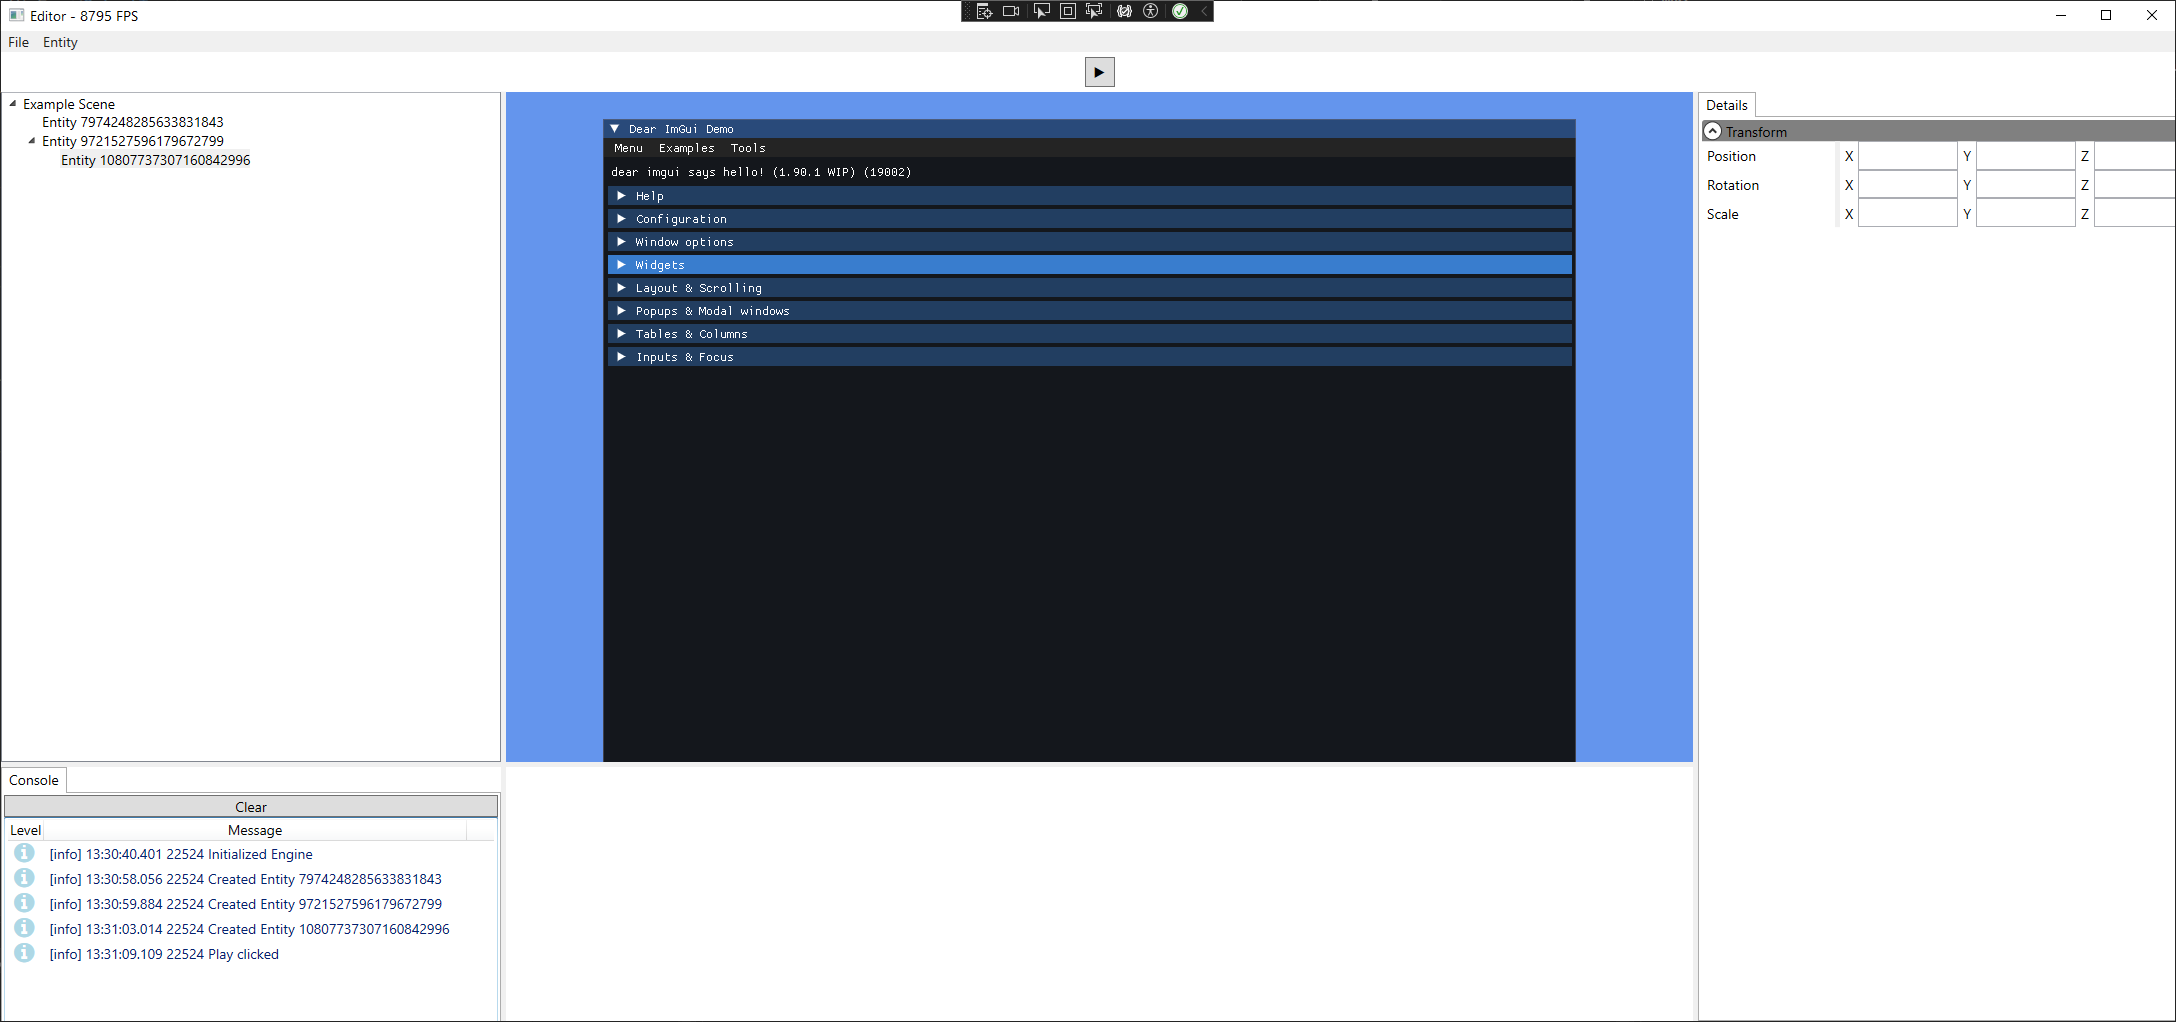
As 2023 came to a close, I found myself pondering alternative methods for creating a Windows game engine editor beyond the typical C/C++ technologies like MFC, Qt, or ImGui. Having always enjoyed working within the .NET ecosystem with WinForms and WPF, I was curious about the feasibility of hosting a C++ DirectX-based renderer in a WPF application. This approach leverages the strengths of both C++ for the core engine and C# with WPF for building a powerful UI.
Windows offers multiple options for communication between C# and C++ applications, such as P/Invoke, C++/CLI, COM, and IPC/sockets. I chose P/Invoke due to my familiarity with it. However, a significant downside of using P/Invoke is the necessity to provide a C API, which can introduce considerable maintenance overhead to a project.
The Win32 Window
To create a DirectX context, we need a Win32 window. Let’s see how to achieve that, focusing on the essential aspects while bypassing unnecessary specifics related to WPF, DirectX, Win32, MSBuild/CMake, etc. For a deeper dive into these areas, refer to the relevant documentation.
LRESULT CALLBACK WindowProc(HWND hwnd, UINT msg, WPARAM wParam, LPARAM lParam)
{
	switch (msg)
	{
	case WM_CLOSE:
		DestroyWindow(hwnd);
		return 0;

	case WM_DESTROY:
		PostQuitMessage(0);
		return 0;
	}

	return DefWindowProc(hwnd, msg, wParam, lParam);
}

void* Initialize(int width, int height)
{
    WNDCLASSEX wc;
    ZeroMemory(&wc, sizeof(wc));
    wc.cbSize = sizeof(wc);
    wc.style = CS_VREDRAW | CS_HREDRAW;
    wc.lpfnWndProc = WindowProc;
    wc.hIcon = LoadIcon(NULL, IDI_APPLICATION);
    wc.hCursor = LoadCursor(NULL, IDC_ARROW);
    wc.lpszClassName = L"D3DRenderContext";
    wc.hIconSm = LoadIcon(NULL, IDI_APPLICATION);

    RegisterClassEx(&wc);

    m_WindowHandle = CreateWindowEx(
                0,
                wc.lpszClassName,
                L"D3DRenderWindow",
                WS_OVERLAPPEDWINDOW,
                CW_USEDEFAULT,
                CW_USEDEFAULT,
                width,
                height,
                NULL,
                NULL,
                NULL,
                NULL
            );

    ShowWindow(m_WindowHandle, SW_SHOWDEFAULT);
    UpdateWindow(m_WindowHandle);

    InitializeD3D11();

    return m_WindowHandle;
}

void InitializeD3D11()
{
    ...
    DXGI_SWAP_CHAIN_DESC swapChainDesc;
    ZeroMemory(&swapChainDesc, sizeof(DXGI_SWAP_CHAIN_DESC));
    swapChainDesc.OutputWindow = m_WindowHandle;
    ...
}
Parent Handle and WS_CHILD
.NET provides a convenient way to host a Win32 window as an element within a WPF application via System.Windows.Interop.HwndHost.
This is perfect since we already have a Win32 window.
We only need to provide the handle of the parent WPF application when creating the window and return the new handle.
Let’s update our Win32 application to accept a parent handle and pass it along. Additionally, we need to use the WS_CHILD style instead of WS_OVERLAPPEDWINDOW:
void* Initialize(int width, int height, void* parent)
{
    ...
    m_WindowHandle = CreateWindowEx(
			0,
			wc.lpszClassName,
			L"D3DRenderWindow",
			WS_CHILD,
			CW_USEDEFAULT,
			CW_USEDEFAULT,
			width,
			height,
			static_cast<HWND>(parent),
			NULL,
			NULL,
			NULL
		);
    ...
}
The C API and the C# consumer
Next, we need to create a C API for the Win32 application and the C# consumer, utilizing P/Invoke:
#pragma once

#ifdef _WIN32
	#ifdef LIBRARY_EXPORTS
		#define C_API extern "C" __declspec(dllexport)
	#else
		#define C_API extern "C" __declspec(dllimport)
	#endif
#else
	#define C_API
#endif

C_API void* InitializeRenderContext(int width, int height, void* windowHandle)
{
    return Initialize(width, height, windowHandle);
}
using System.Runtime.InteropServices;
namespace EngineSharp
{
public static class EngineAPI
{
private const string DllName = "Engine.dll";
[DllImport(DllName, CallingConvention = CallingConvention.Cdecl)]
public static extern IntPtr InitializeRenderContext(int width, int height, IntPtr windowHandle);
}
}The WPF component
Finally, let’s create a WPF component that encapsulates the Win32 handle and puts everything together:
using EngineSharp;
using System.Runtime.InteropServices;
using System.Windows.Interop;

namespace Editor.Controls
{
    public class RenderSurfaceHost : HwndHost
    {
        private readonly int _width = 800;
        private readonly int _height = 800;
        private IntPtr _windowHandle = IntPtr.Zero;

        public RenderSurfaceHost(int width, int height)
        {
            _width = width;
            _height = height;
        }

        protected override HandleRef BuildWindowCore(HandleRef hwndParent)
        {
            _windowHandle = EngineAPI.InitializeRenderContext(_width, _height, hwndParent.Handle);
            Debug.Assert(_windowHandle != IntPtr.Zero);
            return new HandleRef(this, _windowHandle);
        }

        protected override void DestroyWindowCore(HandleRef hwnd)
        {
            // Add your logic here to cleanup the Win32 window and DirectX context
            // e.g. EngineAPI.DestroyRenderContext(_windowHandle);
            _windowHandle = IntPtr.Zero;
        }
    }
}
Conclusion
For larger projects, I wouldn’t recommend using P/Invoke, as the required C API adds significant maintenance overhead unless it’s already needed for another reason. A more sustainable approach for C++ is likely using C++/CLI, potentially using a generator like SWIG or SharpGenTools, but that’s a topic for another day. :)